Pascal Hilkens Astro Home Page
Monday, July 11, 2016
Sunday, July 10, 2016
Sunspot AR 2561-2564 with Baader solarfilm
Today I used first time ever Baader solarfilm to make some pictures of the sun. The solarfilter from Baader ND5.0 was assembled on the TAL 200K. Pictures taken by Nikon D60 on the oculair.
Results show a more white picture then the one i used before. This was more yellow.
Results show a more white picture then the one i used before. This was more yellow.
Saturday, July 9, 2016
Again sunspots and bright sundogs
During the sunny periods I was able to observe a big flare and a few sunspots with the PST Coronado 40mm. Unfortunately I was not able to take some pictures as I still was busy how my new AZ-EQ operates. On top of that the battery went down of the powerpack.
Luckely and due to high clouds at sunset some sundogs appeared, first right, later to the left of the sun. And that I was able to put on camera.
Luckely and due to high clouds at sunset some sundogs appeared, first right, later to the left of the sun. And that I was able to put on camera.
 |
| My weatherstation with a sundog in the back. |
Giardano Bruno - Rome
When visiting the campo de fiori in Rome you will see in the middle of the market place a statue of Giordano Bruno. He lived from 1548 - 1600 and he's known for his cosmological theories. He believed that the stars were distant suns surrounded by their own (exo)planets and he even mentioned the possibility that these planets could even foster life. He also insisted that the universe is in fact infinite and could have no celestial body at its center.
He was put in prison and after his 7years trial he was convicted by pope clement VIII and burned at the stake.
Friday, July 8, 2016
Picture Sun PST
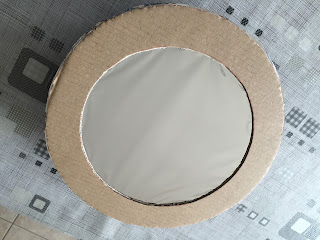
DIY Solarfilter
How to make your own solarfilter for your telescoop or camera? This is how you can do it.
What do you need?
Scissor, cardboard, pensil, knife, two sided tape, normal tape and solarfilm.
Step 1 : take the cover shield from your camera or telescoop (in this example it is for my 200mm scope) as a the inner diameter and add 5 cm for the outside diameter. Use the knife to cut the ring. Complete this step once more for having two sets of rings.
Step 2 : Put two sided tape on both rings and pull the strip off.
Step 3 : Take the solarfim - I'm using astrosolar film from Baader D5.0. Open the sheet and keep it flat by taping the ends on the table. Let one ring with two side tape "fall" on the solarfilter so it sticks to it. Turn it upside down and do the same for the second ring.
Step 4 : Make 3 to 4 long strips of cardboard about 5 cm wide. Fold them around the tube of your telescoop or camera lens and tape the ends together. The result is shown below as a "belt"
Step 5 : Finally tape both the ring with the solarfilm to the belt and make it rigor using normal but strong tape.
Picture taken from the "inside"
Picture taken from the outside.
Sunset at 10.000m
Sunset during flight from Geneva to Brussels results in beautifull pictures. The picture below was taken on July 5th around 10pm at 10.000m hight using my iPhone 6.
Subscribe to:
Comments (Atom)


